![]()
![]()
![]()
| Machine Code |
Continuing his look at Z80 operations Marcus Jeffery loops the loop
Not having the structure available in many languages, such as Pascal, machine code programs rely on the use of jump statements. Those are akin to the Basic GO TO command. A typical machine code jump might look like
  EA6O 3E01   LD A,1
  EA62 C360EA JP EA60
which would load the accumulator with the value one, then jump to location EA60 (hex) to repeat the instruction.
When using machine code, we usually use an assembler, and those allow the use of labels to make jumps clearer. You will have seen those before in the mnemonic listings, and a number of labels can be seen in figure two. The above loop could thus be
  EA60 3E01   LABEL LD A,1
  EA62 C3EA60       JP LABEL
That of course is an infinite loop, and does not allow an exit. The Basic equivalent would be
10 LET A=1: GO TO 10
A very similar instruction to JP is JR - Jump Relative. When using JP, the program always jumps to the specified location. With JR, however, the program jumps to a location relative to your present location. The example above using JR would be
  EA60 3E01 LABEL LD A,1
  EA62 18FC       JR LABEL
which would jump to the location EA64 - the start of the next instruction - minus four - giving EA60.
The JR instruction has the advantage of being one byte shorter - two bytes instead of three - but that implies that you cannot use it to jump any great distance. The displacement byte is assumed to be PLUS - forward - if it is less than 80h and MINUS - backwards - if greater than 7Fh. In the latter case, the value is calculated as 100h (256) minus the value given.
We can check this with
  FCh     = 252
  256-252 = -4
  EA64h-4 = EA60h
That means that we have a range of
  00h-7Fh (0 to 127)
and FFh-80h (-1 to -128)
The other advantage of using JR, rather than JP, is that it is relocatable. We will be discussing this in a later article, but essentially it implies that the actual address is not used.
Of course, just as in Basic, jumps are not much use on their own. Their real power is only realised when they are combined with conditions. Z80 machine code does not have the flexibility of Basic when testing for conditions.
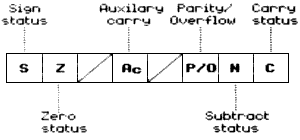
All testing is carried out on the hitherto unused F (Flag) register. The individual bits of this register are used as shown in figure one. The values of the bits in the register are set based on the last operation, so they can then be tested using special instructions.
All the jump instructions are shown in figure six, but here is a typical example, showing how to form a loop.
        .
        .
        .
        LD HL,1
LOOP    ADD HL,HL
        DEC A
        JR NZ,LOOP
        .
        .
        .
The HL registers are initially loaded with the value of one. The ADD instruction effectively multiplies HL by two. The value of A is then decremented, and if Not Zero (NZ) a relative jump is made, otherwise the code continues. This small piece of code has the effect of placing the value of 2^A into HL, assuming that A is greater than zero and not too large to cause HL to overflow.
Special instructions are also provided whose only job is to set flags in the F register. Those are the compare instructions - see figure six. In the counter program we use.
CP 8Ah
That subtracts the data (8Ah) from whatever value is currently in the accumulator. The flags are set, but the value of the accumulator is left unchanged. The next instruction is
JR NZ,CHANGE
which will now jump to the label CHANGE if the contents of the accumulator are not 8Ah - that is Acc-8Ah <> 0.
One final test instruction which we will look at is BIT. That can be used to test individual bits of a particular register or location. In our program
BIT 7,A
tests to see if the most significant bit - the top bit, counting from bit 0 left to right - in the accumulator is set. If the specified bit is set - in other words, is a '1' - then Z (Zero) in the Flag register will be False. That may seem complex at first, because the complement of the specified bit is placed into the Z flag. Have a look at the program to see how this works.
Other bit instructions which you may come across are SET and RES, which place a '1' or '0' respectively into a specified bit. Variations of this instruction are shown in figure six.
We have seen how to implement a loop using a conditional jump instruction. Z80 also has a specified abbreviated loop instruction called DJNZ. This stands for 'Decrement the B register and Jump to a given label if Not Zero'.
So, if we wanted to improve the example above, by using the B register instead of A, we could write
        .
        .
        .
        LD HL,1
LOOP    ADD HL,HL
        DJNZ,LOOP
        .
        .
        .
There is one last set of instructions to look at before we deal with this month's program. Those are the 'stack' operations. When using machine code, it's very easy to run out of registers to use. One way of dealing with that is to save the register to a spare location, use the register for another task, then reload it from the location.
There are a number of disadvantages with this method, and it is such a common problem that there are a number of special instructions to deal with it. Those are called PUSH and POP. A stack can be thought of as a pile of plates. If a plate is PUSHed onto the top of the pile, then it must also be the first removed - POPped.
Registers may be pushed onto the stack in pairs - A+F, B+C, D+E and H+L - and popped from the stack in the same way. A pointer to use the top of the stack, surprisingly known as the stack pointer (SP), is automatically updated for you.
The only thing to remember is to take the register pairs off the stack in reverse order to which they were put on. This is known as a LIFO - Last In, First Out - structure.
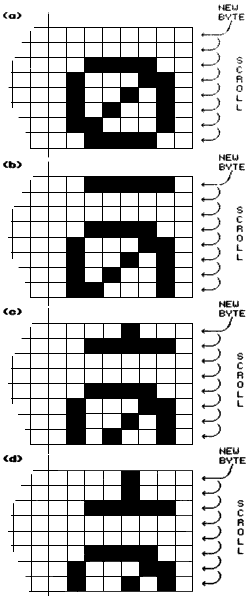
Now the program. The idea is to implement a digital counter, which will automatically update its value by one whenever it is called, and display the new value on the screen.
The clever bit is to ensure that this update is shown graphically as rotating digits, just like the real digital display. The assembly code for this - figure two - can be divided into three distinct stages:
        EA60-EA76 which adds one to the four-digit counter.

        EA77-EAB0 which does the on-screen scrolling.

        EAB1-EABB which resets, ready for the next call.
The comments should enable you to follow the program, but here are a few points. When incrementing the four digits - each held in one byte, including a fifth overflow byte - the top bit of the digit is set if it has changed. That is the reason for the test 8Ah (Top Bit + 10).
Figure three should give some indication of how the scrolling works. The code from EA88 to EA94 scrolls the necessary characters down by seven pixel lines, and the code to EAA2 finds the value of the next byte to be placed on the screen from the Spectrum character set. The four instructions from ESHIFT create a delay loop, to give you time to see the display. To halve the speed of the scrolling, increase the number loaded into E, at ESHIFT, by one.
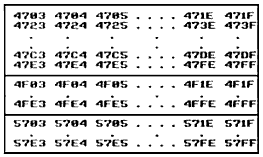
Finally, the two numbers held in location EAC1 and EAC2 - label DSPLY - are the bottom- right screen address of the four bytes displayed. Figure four gives a list of the values you can place in here to move the counter on the screen.
Figure five gives a Basic loader program and example calling routine. You will notice that lines 40 to 70 use our special abbreviations for graphics characters, so please read the instructions on the first page of Program Printout.
You might like to change the program. First of all, to make the program count downwards, rather than up, change the following
Line 2010: 3C to 3D
           FE8A to FE7F
Line 2020: 3680 to 3689
Line 2170: 09090909 to 00000000
Line 2180: 00 to 09
This will then count down from 9999. Note that all the digits change when the routine is first called, ensuring that all the digits are displayed.
If you would like to count from a different number, simply change the start digits at the end of line 2170, and print the start number in line 70, instead of the four spaces. The INK statement in line 70 also specifies the colour of the digits.
It is quite a simple matter to modify the code to work with more than four digits. To add a fifth digit, change thee start number (line 2170) to a five- digit figure. You must also change the address of the display location - presently EAC1. So alter the C1EA to read C2EA in lines 2030 and 2050.
|
|
|
|
|
|
IN GENERAL, graphics abbreviations are enclosed in brackets, which should not be entered. A string of the same graphics character is represented in the form (3*A) which would be entered as AAA, where A is the graphics character. A space, where it is important to have the correct number of spaces, is indicated by (sp). Spaces in text will not normally be indicated. Where several graphics characters are used, they are separated by commas, which should not be entered. With Spectrum and QL listings the letter I has a flat top and the numeral 1 has a sloping top.
The above applies to all Sinclair machines. The following instructions are for specific machines.
ZX-81: ZX-81 listings are generally reproduced as they appear when you enter them, spaces and all. Where extensive graphics are used, REM statements will be inserted to provide a guide to the position of each character.
Spectrum: User-defined graphics are represented by underlined letters, without brackets. Type the appropriate letter while in graphics mode. The underline does not appear on the screen. Inverse characters have the letter i before them, e.g. iZ, iA, iP. Block graphic characters are indicated by g followed by the number of the appropriate key: g4 would mean the block graphics on key 4, ig4 the inverse of that graphic. Control codes are indicated by cc before the character, and are obtained by pressing CAPS SHIFT while in extended mode. They do not appear on the screen but may change the colour of the cursor and will affect what is printed after them: cc3,i* would thus have the effect of printing an inverse asterisk in red.
QL: User-defined graphics on the QL are indicated by a description of the keys pressed to obtain them, underlined and in brackets. Thus (CTRL + 9) means press CTRL and 9 together. The same applies for unusual characters within the QL character set, which our printer is unable to reproduce.
Previous article in series (issue 39)
Next article in series (issue 41)
![]()
![]()
![]()